
Perspective Circles
Simple & Effective
When I was a kid I loved to draw cars and my favourite part was the wheels. I’d draw around a coin and they always looked so good!
Unfortunately the more I drew the more I realised drawing around a coin had its limitations. One of the most useful drawing techniques I was taught was to draw a circle in perspective.
We will go over that technique here, then examine its application to our paintings.

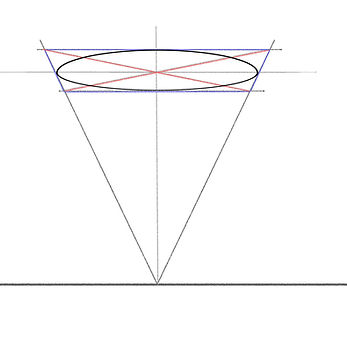
There are a couple of ways to draw a circle in perspective. In this example a square is drawn using 2 point perspective (Blue lines), diagonals are drawn through the square (Red lines)
The crossing of these diagonals give us the center of the square in perspective.
Running lines back to our vanishing points, through this center point, will divide each side of the blue square in half (indicated by the 4 arrows)
These halfway points can then be used to plot in the arcs of the circle.
Notice how the halfway points appear closer to the far end of the blue lines due to the effect of perspective.
The same method can also be used for a square drawn with one point perspective.


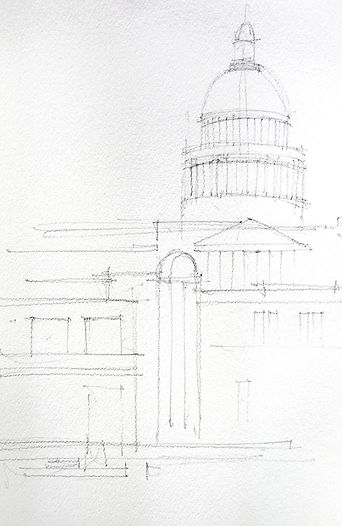
This dome capped building is made up of a series of different sized circles. To draw the building we can use one point perspective to construct the series of variously sized and spaced circles to create a framework. Working carefully, this will give us an accurate rendering of the building.

While this technique is good for accuracy, it can become cold, clinical and technical. It is important to use this technique to learn just how perspective affects the shape of a circle, but when it comes to painting, I prefer a looser approach.
Keeping in mind how a circle changes in shape according to elevation and perspective, we can then draw freely what we see and understand, producing a drawing with much more interest and character.
This quick, rough sketch shows how a looser, more spontaneous approach puts more life and character into the drawing, while still producing a reasonably accurate likeness.
Demonstration Painting
To start the painting, I made a simple pencil sketch, paying attention to proportions and making sure the circles flattened out as they were drawn closer to the horizon. There was no need to go through the construction of perspective circles again. The main thing to watch is symmetry and the gradual flattening towards the horizon.

The first washes in the sky were a mix of French Ultramarine, Permanent Alizarin Crimson and some Indian Yellow. They were dropped onto wet paper and allowed to bleed and spread.
A few marks mixed from the same colors were loosely sketched into the foreground with a rough ½ inch bristle brush. I like to get some of these rough marks in early on then build detail up around them.

Details were gradually built up. Dark marks were applied with a ½ inch and ¼ inch long flat brush. A wash of Alizarin and Indian Yellow warmed up the facade of the foreground buildings. At this stage I try to work all over the painting, not attempting to finish any one area. Working this way avoids the problem of overworking.

More detail, some stronger colors and a few rough lines of Burnt Sienna Pigment ink. Pure Ultramarine was used to pick out and suggest detail, while a few marks of Phthalo Green provided relief from the warm washes of the building.
These colors and details were not planned, simply inserted as needed as the work progressed.

The final step was to intensify the warmth of the buildings with a wash of Permanent Rose. To contrast with this a complementary Phthalo Green wash was introduced to the sky and water. Phthalo Green was also mixed with White Gouache to put a little more punch into some of the windows.
While the painting looks detailed and intricate, most of the detail is suggested. The tower and dome while looking solid and convincing are treated in the same loose manner as the rest of the painting. Over-drawing the dome would have made it appear too clean and technical, taking away from the worn, weathered patina of the architecture.
So after all this, you might wonder — why bother learning to draw circles in perspective at all?
The answer is simple: to understand how perspective changes the shape of a circle. Once you’ve drawn a few this way, you’ll start to see and remember how perspective affects them. You won’t need to go through the whole construction process every time, but your freehand circles will look far more convincing — without becoming stiff or mechanical. If I hadn’t practiced perspective circles, I’d probably still be drawing around coins.
Author: John Lovett