
Painting Fine Lines
Wear and tear on our brushes is something that slowly sneaks up on us, particularly with fine riggers and sable brushes. Lets take a look at the best ways to make those beautiful, hair thin lines in our paintings.
Painting fine lines with less than perfect brushes is a difficult, if not impossible task. That hair thin line they used to produce with ease when new, slowly becomes thicker, heavier and clumsier.
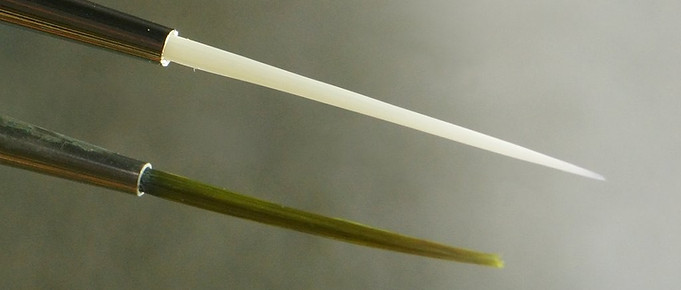
The difference between a new rigger and one a few months old is obvious when they are side by side. These are Taklon fibre riggers. The brand doesn’t seem to matter. I buy cheap ones and change them regularly.
The impact on our work is obvious and detrimental. This week I threw out all my rigger brushes and replaced them with new ones – something I do every few months. They are inexpensive and the difference is amazing.
It is easy to overlook the importance of those beautiful fine lines threaded through our paintings. Without them our work tends to look course and lacking in detail – something like comparing a retina display with a TV from the 1980’s.
We are going to examine a number of ways to ensure our fine lines are kept crisp, confident and hair thin.
Painting Fine Lines with a Rigger Brush
The secret to producing fine lines with our brand new rigger is to hold the brush perpendicular to the paper and allow just the tip to make contact. Brush movement should be deliberate and controlled. Long strokes are best made from the shoulder, not the wrist or fingers. Wrist and finger movement should only be used for the shortest strokes, and even then, a quick movement from the elbow will produce a nicer line.
Painting Fine Lines with Pen and Ink
Ink lines are another way to introduce fine sharp lines into your work. The best nib is the simple old writing nib – nothing fancy and no chisel tip. A new nib takes a couple of months to wear in. The tip gets polished to the angle you hold the pen. After a while it will free up and not bite into the paper. The nibs also become more flexible and responsive over time, so unlike the rigger, the older your nib the better, provided you look after it.

Making Fine Lines with a Charcoal Pencil
Don’t overlook pencils when it comes to fine crisp lines. The secret is to keep them sharpened to a long sharp point. The best way to do this is with a craft knife and a careful stroke that just shaves off the wood and misses the core

Once the core is exposed, gentle sanding on a piece of sandpaper will make a fine point. Hard pencils will hold a point for a long time. This charcoal pencil needs constant attention to keep it producing nice fine lines..
Painting Fine Lines with Masking Fluid
Masking fluid can make brutal heavy lines if not applied carefully. I use a similar pen to the one I use for ink and put it on in microscopically thin lines.

It seems, no matter how finely you apply the masking fluid, it will still protect the paper.
Thick lines of masking fluid can be blatant and hard edged, making them difficult to tie into your painting. Keeping them fine like this makes them easier to incorporate.

As well as adding clarity to your paintings, painting fine lines can adjust and correct details.
This group of windows are fairly rough and loose. To get them looking aligned and correct requires just a few lines to square them up and realign them.

The fact that the initial marks were loose and imperfect adds character to the windows, but because of the fine lines, they appear solid and correct.
The fine lines in this painting give it a feeling of accuracy and detail even though it is loose and suggested. Fine rigger lines, pen lines and thin charcoal pencil marks create the impression of intricate detail


This closeup shows the interesting variation in line quality. Some of the vertical lines on the veranda were applied with a 1/4 inch flat brush and a pale green mixture of gouache. These contrast with hair thin rigger lines, rough charcoal lines and fine white lines made by cutting the dark mass of the window carefully up to a fine line of untouched white paper.
This painting is built up with loose layered washes to create an indistinct suggestion of the subject. Painting fine lines with a rigger brush brings all the details into focus without the ambiguous nature of the initial shapes being lost.


Fine rigger lines suggest detail in what is a loose arrangement of shapes.
The appearance of architectural accuracy in this painting is a result of the fine lines that define and correct the loose collection of shapes. This inaccurate suggestion, adjusted by fine, precise lines, creates a more interesting interpretation of the subject than carefully rendering every aspect of the painting. It is often the contrast between accuracy and looseness that makes a painting interesting.

Consider the impact of a variety of fine crisp lines in the next painting you do. Add some intricate detail and thin correcting lines to up the resolution of your painting. Before you start though, sharpen your pencils and examine your rigger brush – it could be time for a new one!
Author: John Lovett